
See how much extra income you could potentially gain using our MAXpay service… Put in your yearly figures and the extra disposable income will be shown automatically at the end…
Accelerate Workforce Solutions
Portal User Guide for Workers
Everything you need to onboard, sign your contract, and manage timesheets, expenses and payslips in Xemplo.
Updated 24 June 2026Getting Started
Welcome to our Portal
Xemplo is the platform Accelerate use to manage your onboarding, contract documentation, payroll information, compliance requirements, timesheets, leave requests (if applicable) and payslips.
This guide will walk you through the key steps you need to complete as part of your onboarding and ongoing contract.
Activating an Xemplo Account
Once we set you up as a new Worker, Xemplo will send you an email request to activate your new account.
The invitation email will include an activation link for you to activate your new account and accept Xemplo’s Terms of Use and Privacy Policy.
Please note
Xemplo accounts are created using a unique email address. If you already have an Xemplo account for your email address, you will receive a notification to log in to your existing account.
If you do not wish to accept the usage Terms and Conditions or the use of Xemplo, please contact the Client Services Team.
Setting up an account password
Upon activating a Xemplo account, you will be required to set a new password that meets the minimum password complexity requirements before continuing.
Verifying a mobile number
Xemplo uses multi-factor authentication (MFA) to secure your Xemplo account from unauthorised access. Using MFA requires a user to first log in to their Xemplo account using their password, and then enter a second unique code sent to their mobile phone via SMS to continue using Xemplo.
Please note
If your mobile phone number changes, you will need to contact Accelerate to advise us of your new number. Accelerate will then reset your account in Xemplo.
After you’ve created your new password, you will need to enter the unique code sent to your mobile phone to continue to Xemplo.
Xemplo will use the mobile phone number supplied as a candidate.
Multi-Factor Authentication set up
Once you have confirmed your mobile number, you will be prompted to download or open your preferred authenticator.
Scan the code provided and then enter the one-time code from your Authenticator app.
You will now have access to the portal.
Changing my password
If you have forgotten your password, you can request a link to reset it.
To do this, enter the email address and click Next to take you to the next screen.
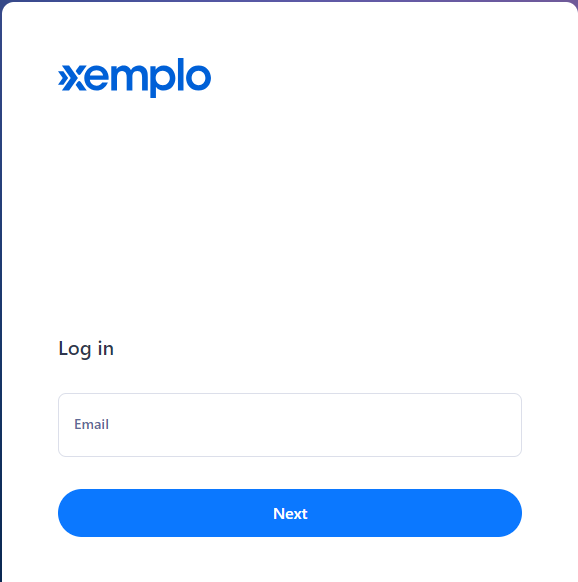
The Xemplo login screen — enter your email and select Next.
Click the option titled “Forgot your password?” on the password screen and follow the on-screen instructions to receive a password reset link by email.
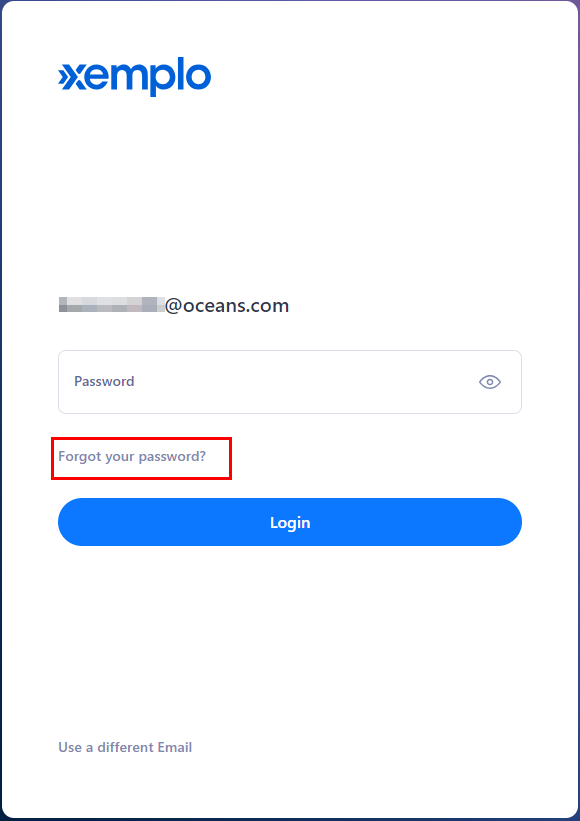
Select ‘Forgot your password?’ to start the reset process.
If you haven’t forgotten your password and wish to change it, log into Xemplo, and open your ‘My Profile’ page, where you will find an option called ‘Change Password’.
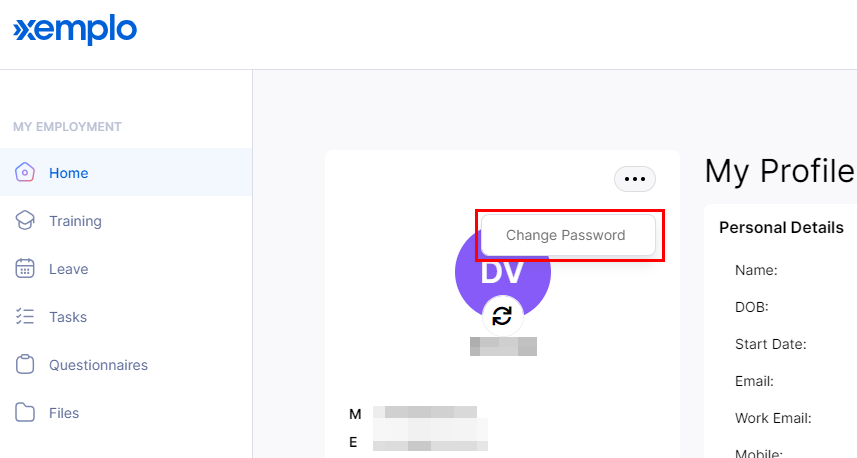
The Change Password option inside My Profile.
Follow the instructions on the Change Password pop-up window to change your password.
My Onboarding Process
Your onboarding happens in eight steps, from receiving your invitation through to final submission and review.
1
Receive & Start Onboarding
We will send you an invitation by email to commence your onboarding. The invitation email will look like this.
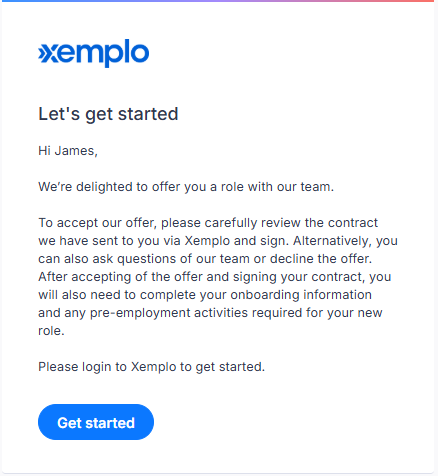
Example onboarding invitation email with the Start Onboarding button.
Click Start Onboarding. If you don’t yet have an account with Xemplo, you will be prompted to create a password.
See detailed instructions: Activating an Xemplo Account
2
Letter of offer
In this step, you will be presented with a letter of offer that details the conditions of your engagement. Here you can:
- Send a message to ask questions about your letter of offer
- Download a PDF copy of the letter of offer
- Accept or decline the offer
See detailed instructions: Sign a Contract
3
Signing of Contract
Once you have accepted the letter of offer, you will be presented with your digital contractor agreement and any client-specific deeds. At this step, you must sign it. You will find an option to sign it digitally.
See detailed instructions: Sign a Contract
4
Declaration
Next, you will be informed that your information will be shared with third parties, such as banks, relevant government authorities, and other benefits funds, throughout your engagement. You will be asked to acknowledge this.
5
Work Rights
In this step, you will be asked to upload proof of your right to work in the country you are being engaged.
6
Worker Dashboard — Get Started
You will be taken to review and complete the following information:
- Personal Details
- Emergency Contacts
- Tax Declaration
- Bank Account Details where you will receive your remuneration
- Superannuation Details (applicable if you are employed in Australia)
See details to edit your profile later: Editing My Profile
7
Policy Documents
You will be asked to read workplace policy documents. You will be asked to acknowledge this.
8
Finalise & Submit Onboarding
This is the final step of your onboarding, where you will submit your onboarding.
This step requires two-factor authentication, where a code will be sent to the mobile phone you declared. You will need to enter that code on the screen in order to proceed. If the code contains any letters, they will need to be entered in the same case as seen on your phone.
Once you submit your onboarding, we will review it.
Important
While your onboarding is being reviewed by us, you will not be able to log in to Xemplo.
You should expect one of the following to happen:
- We will review your onboarding. You will be notified of this by email with a link for you to view any clarifications, where you will be able to make the necessary corrections and submit your onboarding again, or
- We will approve your onboarding. You will be notified of this by email. Once this happens, you will be able to log in to Xemplo.
Signing a Contract
A contract is an agreement between Accelerate (Employer of Record) and an Employee/Contractor that sets out the terms and conditions of engagement. In Xemplo, a contract is an electronic document that must be created and signed by Accelerate and then accepted by you (whether you are an employee or contractor) before starting work. Contracts in Xemplo are accepted by a Worker using an electronic signature.
A contract must be signed to accept an offer before you can continue with the onboarding process.
Viewing a contract
If your onboarding includes a contract to sign, you can view it immediately after signing in to your Xemplo account.
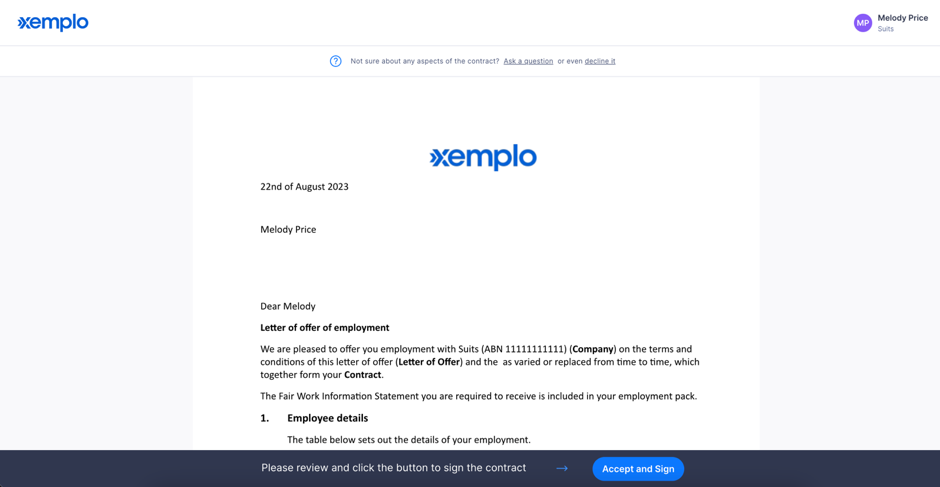
Your contract is available to view once you sign in to Xemplo.
Accepting a contract
If you wish to accept your contract, select the Accept and Sign option at the bottom of the contract screen. You will be asked to supply an electronic signature — you can either draw or type to use a pre-formatted signature.
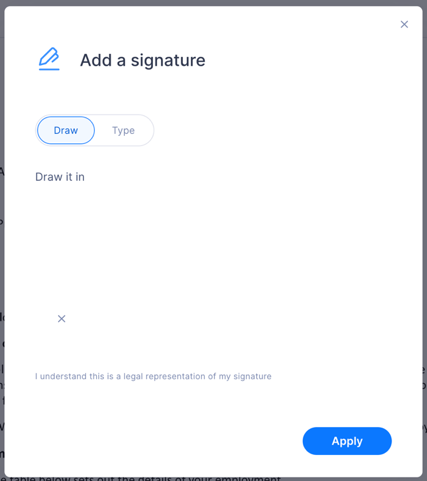
Accept and Sign — draw or type your electronic signature.
Asking questions about a contract
If you’re unsure about any elements of your contract or have a question about the contract process, you can start a conversation with Accelerate from the contract screen using the Ask a Question option (located above the contract).
Selecting Ask a Question will open a chat window where you can send a message to Accelerate.
Please note
Messages are sent via an alert and email. You may not receive an immediate response, and may need to log back in to check responses at a later time. When Accelerate responds, Xemplo will send you an alert via email.
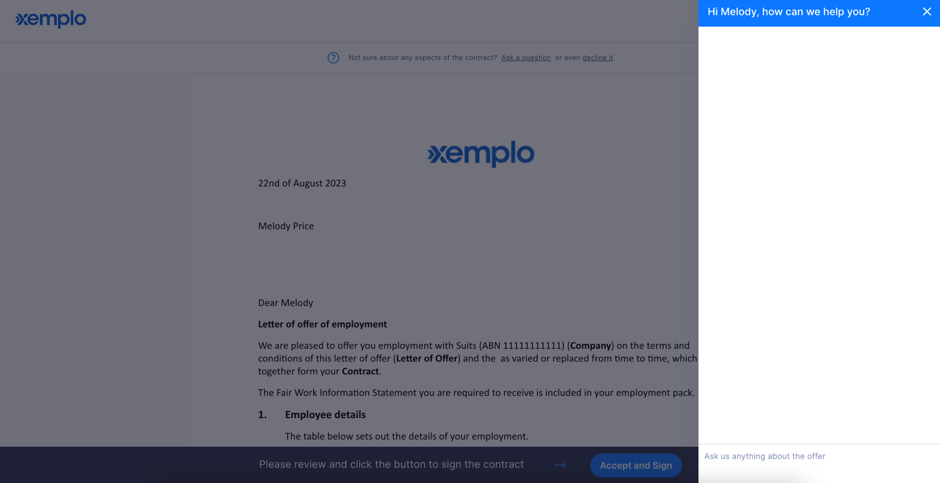
The Ask a Question chat window for contract queries.
Declining a contract
If you do not wish to accept your contract, you can decline it. You should decline your offer only if you no longer want to accept the contract. Declining your contract will end the onboarding process and Xemplo will send Accelerate an alert to advise of your decision.
Please note
If you are unsure about your contract or wish to ask a question, do not decline the contract. Use the Ask a Question option to seek clarification before continuing. Or contact the Client Services team at clientservices@accelerateworkforce.com.au.
To decline a contract, select the Decline contract option (located above the contract). You will be prompted to complete the Decline contract screen, including supplying a reason for your decision which will be shared with Accelerate.
Accessing a contract after signing
After signing your contract, you will be able to download a signed copy of the contract during onboarding using the Contract option on the Worker Onboarding screen.
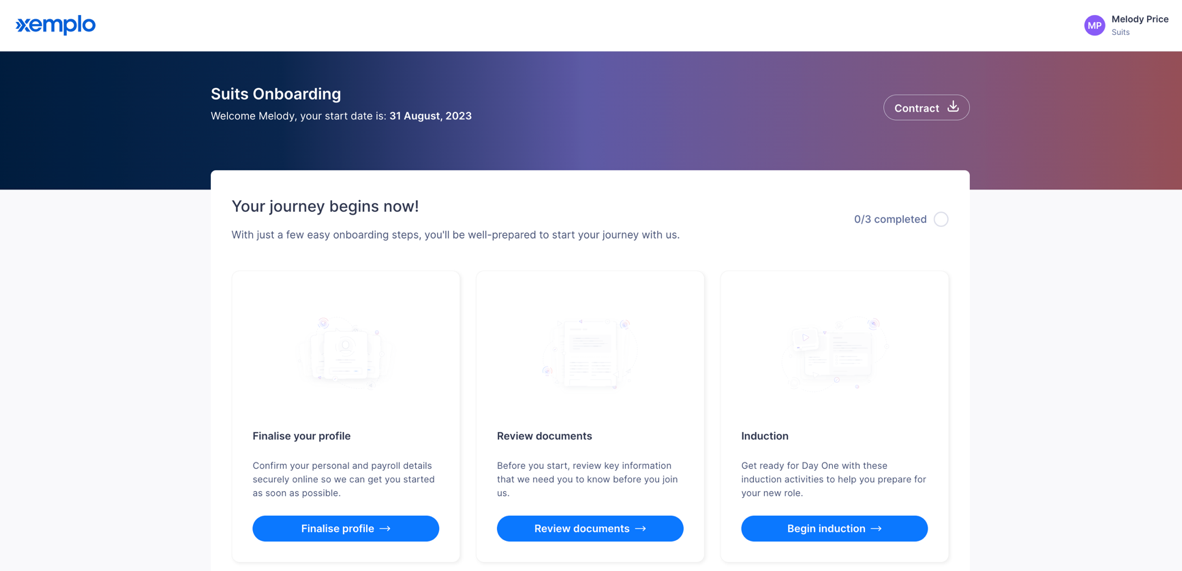
Downloading a signed copy of your contract from the Worker Onboarding screen.
My Dashboard
You will be presented with your worker dashboard after login. This homepage provides quick access to the tools that you will use most often.
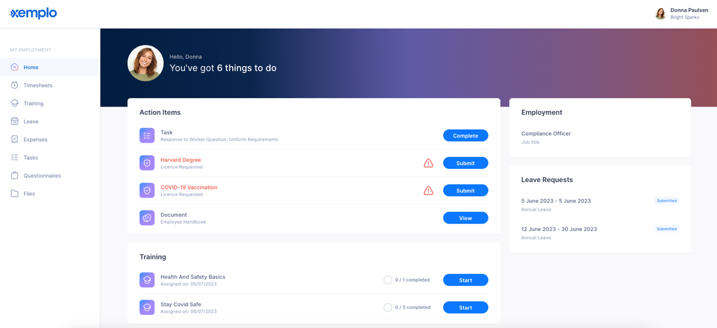
The Worker Dashboard homepage after logging in.
My Profile
You can access ‘My Profile’ information by clicking on the dropdown arrow next to your name on the top right.
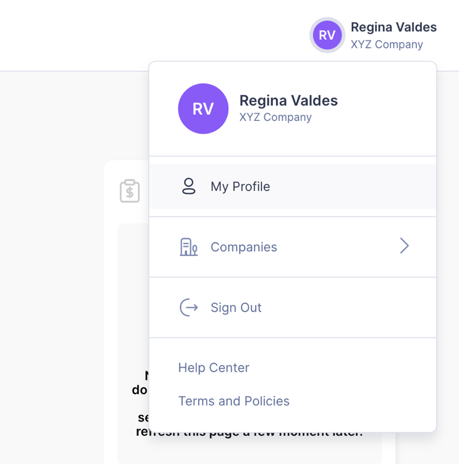
Accessing My Profile from the dropdown next to your name.
You can edit/update the following information on this page:
Personal Details and Addresses
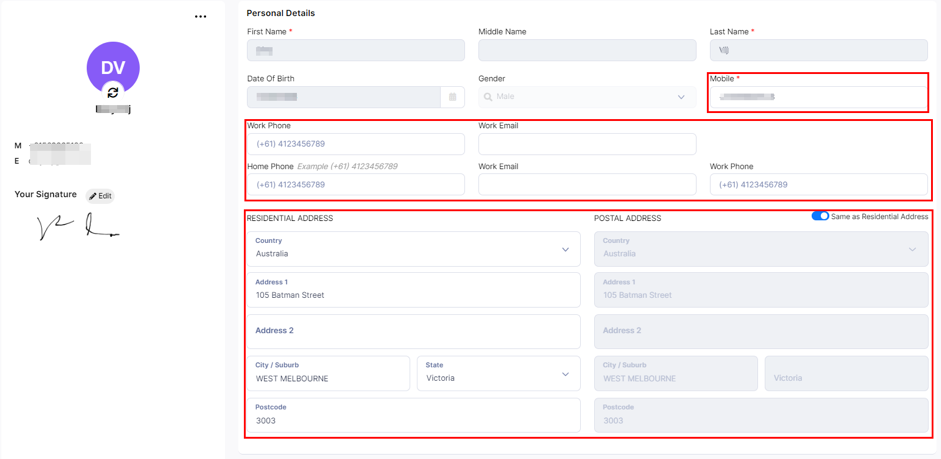
Personal Details and Addresses section of My Profile.
Emergency Contacts
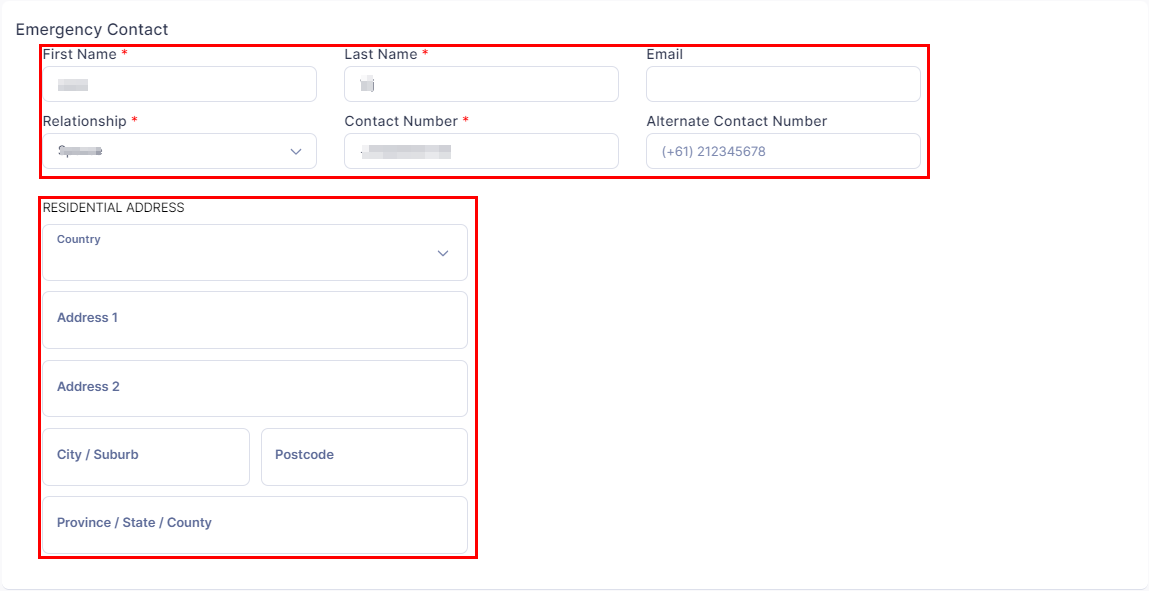
Emergency Contacts section of My Profile.
Bank and Superannuation Details
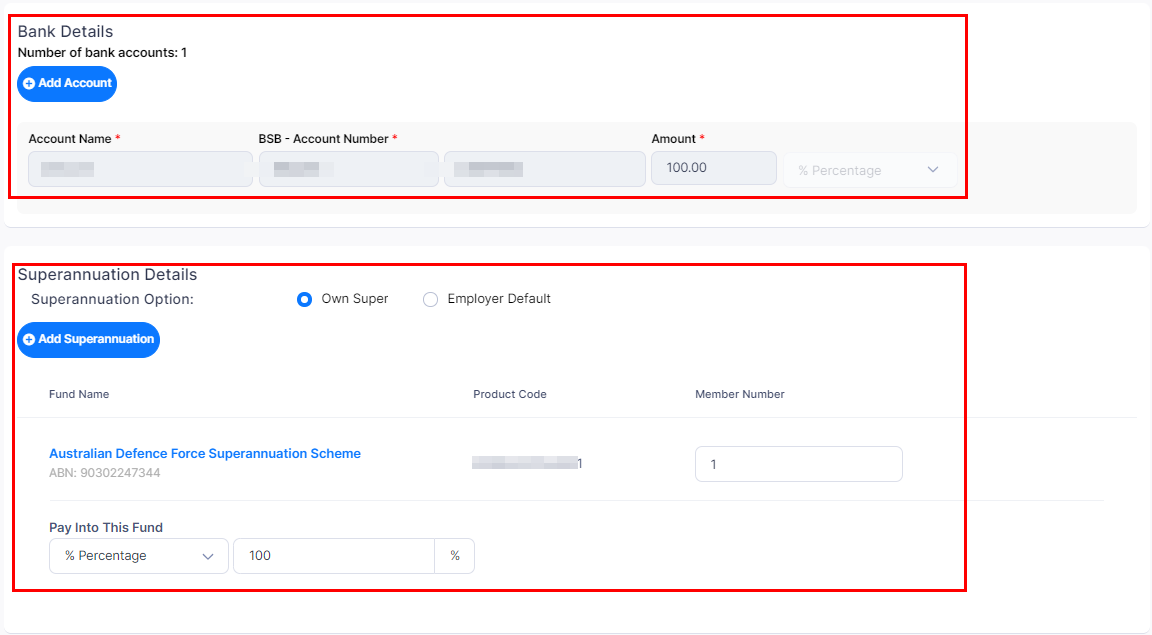
Bank and Superannuation Details section of My Profile.
Tax File Declaration
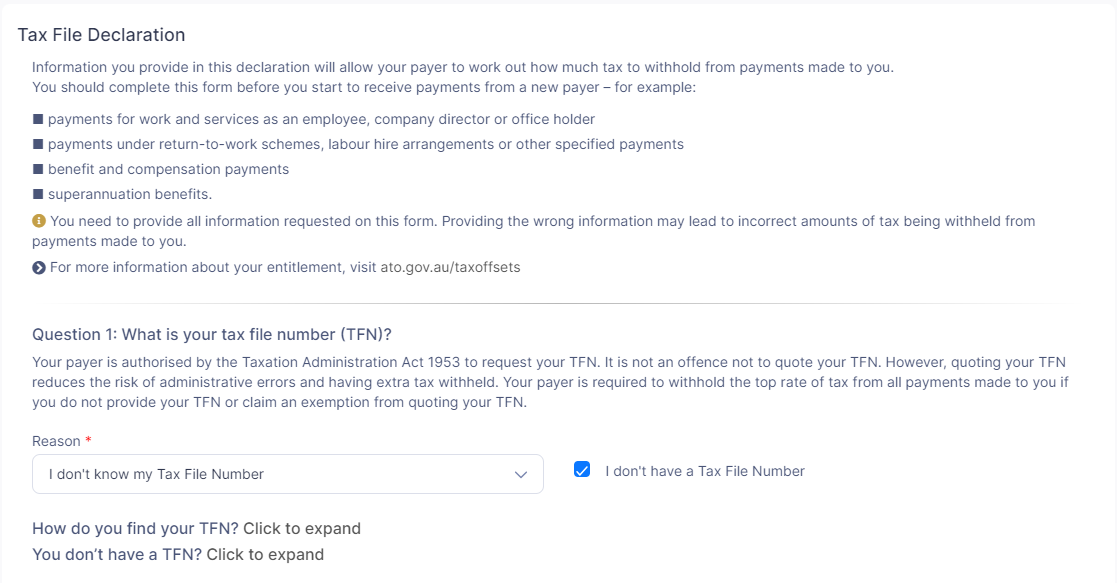
Tax File Declaration section of My Profile.
Please note
All mandatory fields need to be completed; otherwise, the ‘Save Changes’ button will be greyed out, and you will not be able to proceed.

The Save Changes button — greyed out until all mandatory fields are complete.
My Timesheets
This section will help you fill out, complete and submit your timesheets. Then your manager can approve them or get back to you with changes to get you paid correctly.
Timesheets are automatically generated at least 1 day before each pay period. Once a timesheet has been generated, you will be able to see it on your Xemplo dashboard, and under the Timesheets section.
Depending on your pay period, each timesheet will show the respective date and days.
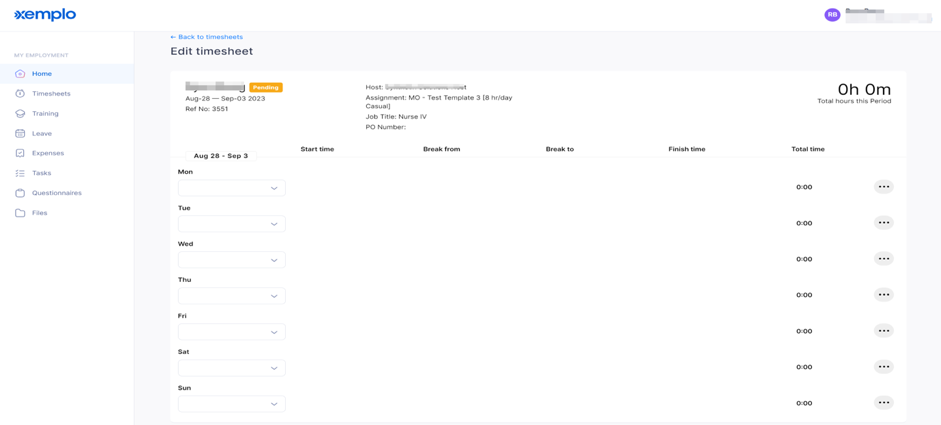
A generated timesheet showing the pay period’s dates and days.
Use the drop-down boxes to choose the appropriate option for each day.
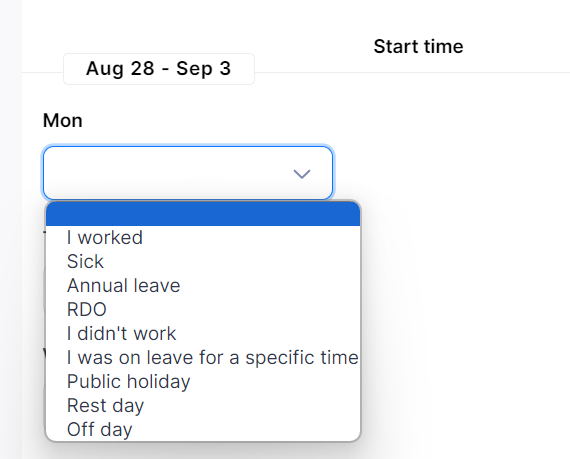
Use the drop-down boxes to select the appropriate option for each day.
Enter the Start and Finish time, and any breaks if necessary.
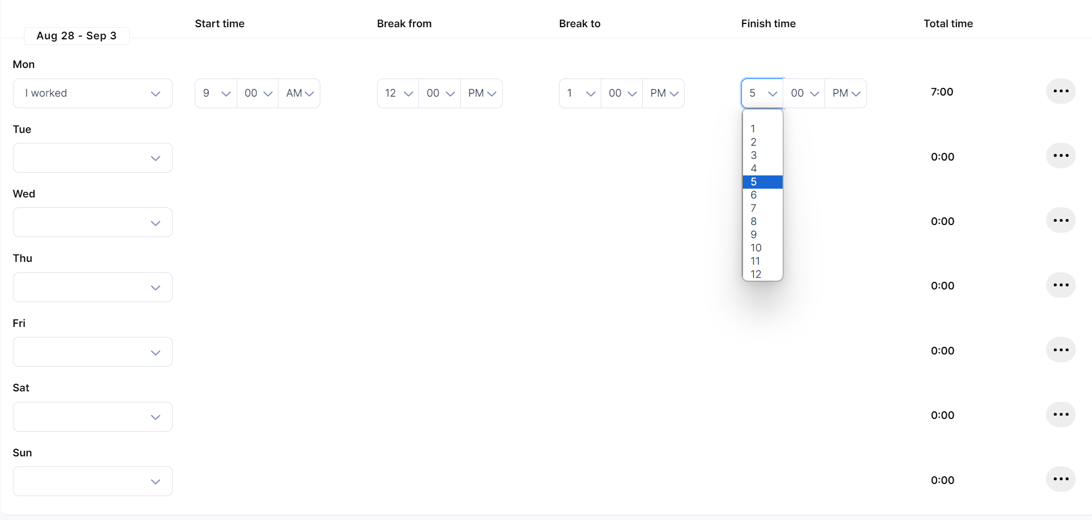
Enter Start and Finish times, plus any breaks.
Once you have entered one row, you can choose from various duplicate options via the “…” menu on the right.
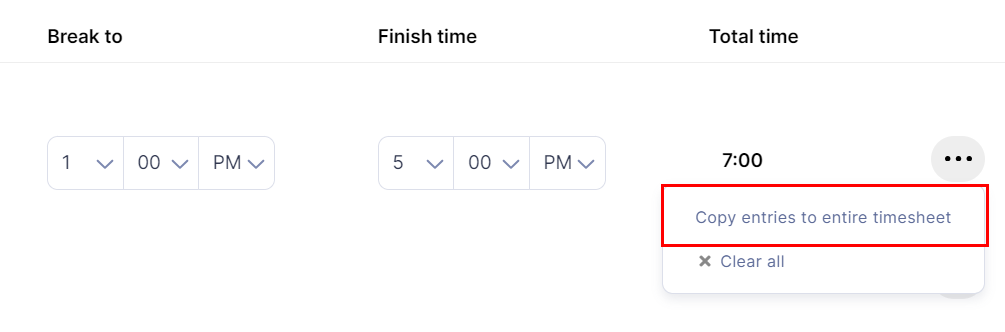
Duplicate row options available via the ‘…’ menu.
After completing the correct information for all days in this pay period, scroll down to attach expense claims if necessary. Click Add Expense, complete all required fields, and attach any files or images.
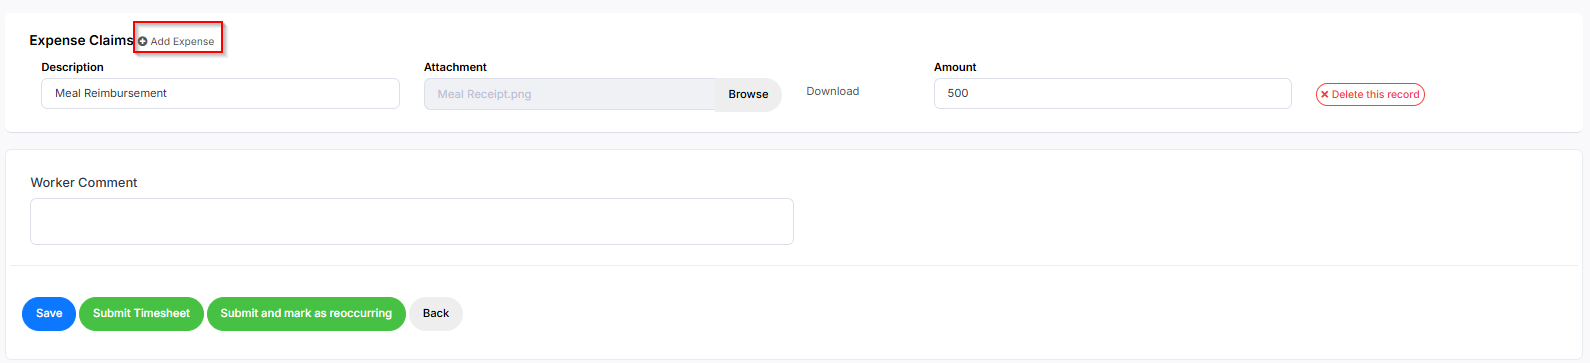
Attach an expense claim to your timesheet using Add Expense.
Once completed, you can choose from the following:
Save
Save this timesheet without submitting it. You can return to it later to complete it.
Submit timesheet
Submit this timesheet to the approving manager.
Submit & recurring
Submits this timesheet and saves its information as a default which the next pay period timesheet will auto-populate with.
Back
Brings you back to the Timesheet dashboard.
Once a timesheet has been submitted, you can easily make changes by clicking ‘Reopen Timesheet’. This will allow you to update the details as needed before resubmitting.
Important
Once a timesheet is approved, you’ll no longer be able to make changes.
After your supervisor approves the timesheet, it will be sent to Accelerate for payment processing.
You can view verified timesheets at any time via the Timesheets menu.
My Expenses
Click on ‘Expenses’ on the left menu bar to access the expense management tool.
The Expense Requests page will display all expense records and their corresponding information.
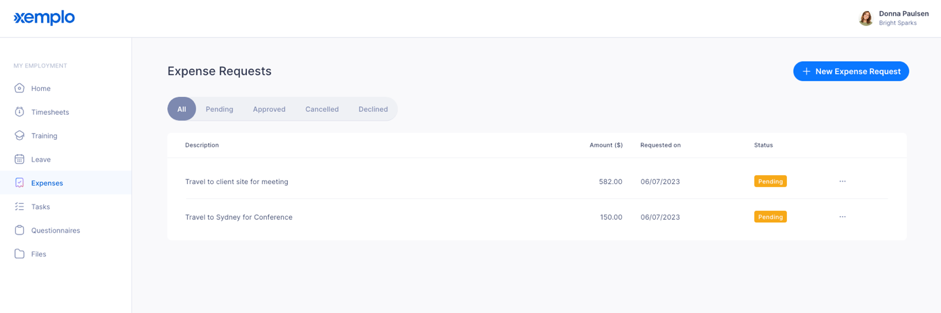
The Expense Requests page listing all expense records.
Create a New Expense Request
On the ‘Expenses’ page, click on ‘New Expense’ on the top right.
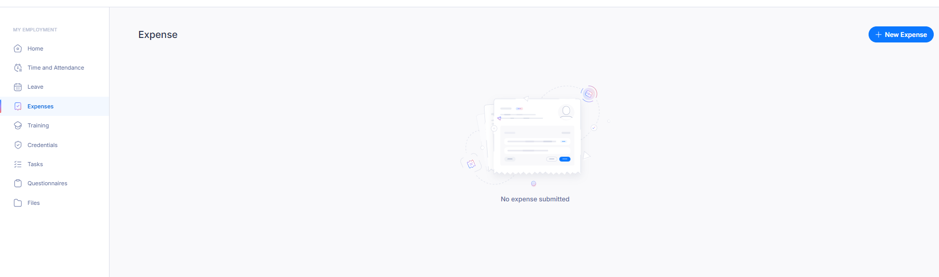
Starting a new expense request from the Expenses page.
A New Expense form will pop up. Please fill in all required fields.
- Description: Information about the expense request, or can be a name of a group of expenses
- Attachments: Upload receipts/supporting documents according to your company policy as required for expenses
- Add Items: Add expenses and details — amount, category, comments (optional), and date incurred
Once you have completed and finalised the details, click ‘Submit’ and it will be sent to your line manager for review and approval.
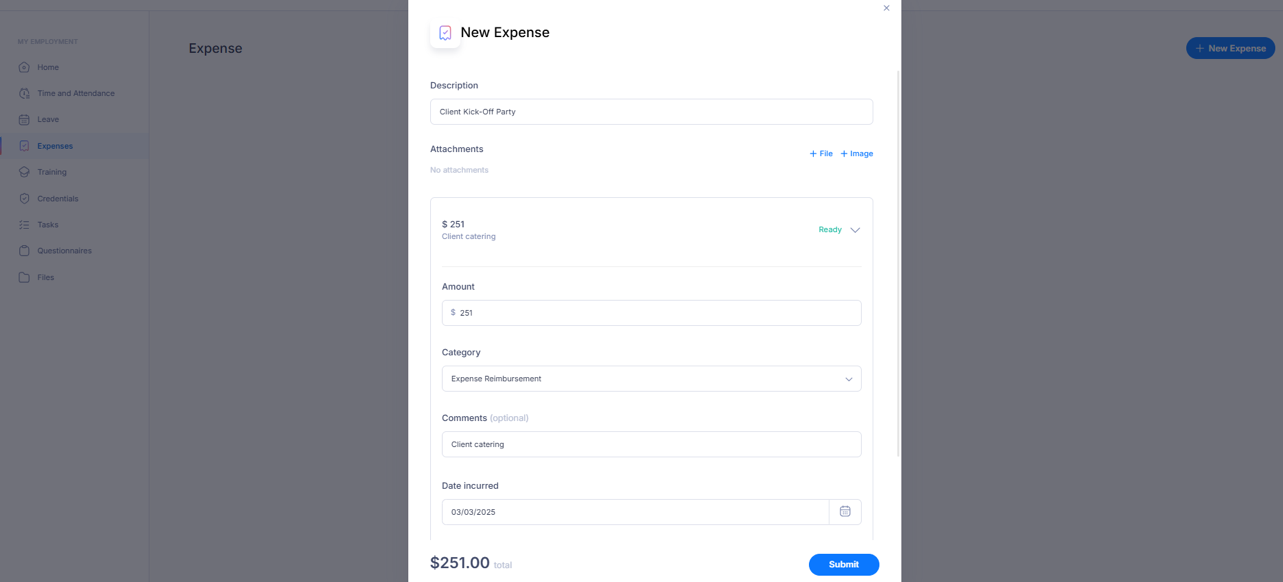
Submitting a completed expense request for manager review.
View, Edit or Cancel Expense Requests
Once an Expense Request has been submitted, you can view, edit and/or cancel it.
Click on the expense to view its details. Click on the menu button on the right of the respective expense request to access the Edit & Cancel options.
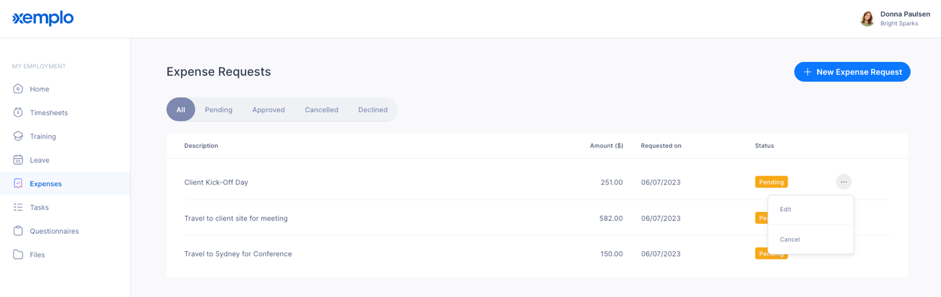
Accessing Edit and Cancel options from an expense request’s menu.
To cancel an expense request, you can click on ‘Cancel’ in the menu above.
Click on ‘Edit’ and an Update Expense Request window will pop up. Make the necessary changes and click ‘Save’ to update the request.
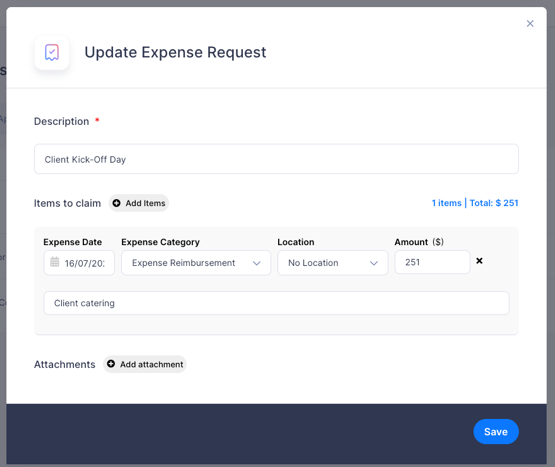
The Update Expense Request window.
My Payslips
From your Home dashboard, under the Payslip section, click on the ‘View’ button to open your payslip, or the ‘Download’ button to download the PDF copy.
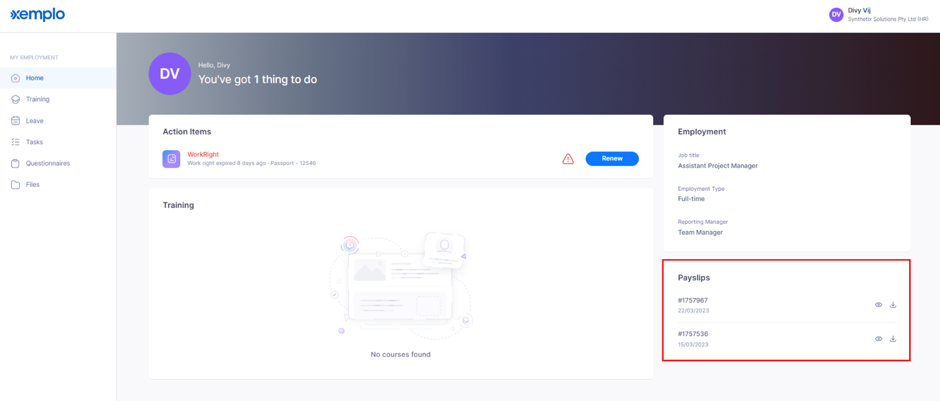
Viewing or downloading a payslip from the Home dashboard.